Maximising the accessibility of a website is always of great importance. As well as the developers improving accessibility there are also a plethora of tools available that increase the accessibility client side. I always encourage the use of client side tools as it makes for a richer more seamless experience.
In the quick look video below I demonstrate the ability of Hacker Vision for Google Chrome. Hacker vision is an extension which is capable of intelligently inverting websites, by which I mean will only invert text and background elements rather than images. This is a vast improvement over say the invert feature built into Apple hardware, as the built in invert operates at the hardware level the entire screen is inverted. Resulting in such elements as images becoming inverted. Hacker Vision negates that and makes for a far more pleasant web experience for the low vision user.
The video also demonstrates the different forms of zoom available to the user, and quickly compares window zoom versus font scaling. I believe font scaling to be incredibly powerful on the client side and is something I will touch on in a subsequent ThoughtCast.
I chose to demonstrate these features with Facebook, mainly because Facebook is often cited as having poor accessibility. I do not believe this to be true I believe a fairer assessment would be to say Facebook is doing a reasonable job and it plays relatively well with client side tools. However, it must be noted that these client side solutions will work on any website and in the case of Hacker Vision can even be tailored to invert only the websites you wish it to. Therefore, a website that does have a dark theme would not be inverted.
]
In order to improve accessibility and user interface design, I am embarking on a project highlighting user journeys.
These user journeys are primarily aimed at user interface and user experience designers, with the idea to improve accessible design. However, they will also serve a purpose of demonstrating whether an app is accessible to the visually impaired community.
My first test video is for TheTrainline, this is an application that allows you to purchase tickets and check live arrival and departure times. I have concentrated on the purchasing ticket user journey for this video, but do intend to cover other features of the app, to discuss how the user interface can be improved.
Accessibility in the workplace is often viewed as a difficult task. Thanks to the increasing IBM and Apple partnership this may become a thing of the past.
Through the mobile first initiative IBM are now beginning to offer the mac desktop as an enterprise solution. This removes one of the biggest barriers to accessibility in the workplace. With Windows being the dominant platform within the enterprise there was a need to install additional software to increase accessibility. This could be seen as adding additional complexity and cost to the system. While there are solutions in place to finance this accessible needs, the additional cost will not be required with the enterprise level switch.
Accessibility will be baked in to every single Mac desktop. No need for specific accessible software or hardware. The same desktop that other employees utilise can now be used by those with a need for accessibility tools. This has removed any additional cost and complexity to supporting users who require the use of accessibility tools.
I do hope this becomes the industry norm. The mac desktop is capable of transforming the work environment and finally giving a level playing field to all.
This accessibility also extends to the Apple mobile platforms. Therefore, the office of the future that includes desktops, iPad’s and iPhone’s will all have accessibility built in. This could truly be a watershed moment for accessibility in the enterprise.
Currently the mac desktop offers the best accessible business solution, the combination of OS X and LibreOffice as an office suite is highly accessible. Not to mention that LibreOffice is free and open source.
I am truly excited for the future of the enterprise and thankful of such a great partnership between IBM and Apple.
In order to silence my every so slightly aging iMac I decided to swap the mechanical HD for a SSD. This also had the added benefit of increased speed, with one downside. A large reduction in storage capacity, I had gone from 1Tb down to 240Gb.
Around the same time I had upgraded my Dropbox to the Pro account, 1Tb of storage. I thought my storage problem would be solved. Oh wait, hang on, I still need the files locally to sync with Dropbox.
This problem set me down the path of configuring my Dropbox to sync files outside of the Dropbox folder. But instead of the folder being on an external drive (too noisy!), I would place the external folder on a Raspberry Pi with an external drive, placed in another room. No noise!
The following is a guide on how you can configure a Raspberry Pi with a Samba share, which in turn can be symbolically linked on OS X to a folder within Dropbox. Therefore, allowing you to have a large synchronised version of your Dropbox files locally.
What you need
Raspberry Pi – Assuming Raspbian installed and running
External HD – For the Raspberry Pi
Dropbox account
Configure the external HD
For this particular setup I was concerned about speed. Therefore, I chose the ext4 format for the external drive. You can of course choose any other format such as HFS, NTFS or FAT for your drive, but this guide specifically deals with ext4.
Identify drive to format
To ensure you format the correct drive use the following command at the terminal on your Pi.
blkid
Your external drive (assuming only drive plugged in) will likely be listed as /dev/sda1 followed by the UUID, take note of this, as you will need it later.
Format the drive
The following code will format the drive on sda1 (change to your drive if it differs) with ext4.
sudo mkfs.ext4 /dev/sda1
Create a folder to mount the drive to
I chose the name “cloud” for my folder, but feel free to change this.
sudo mkdir /media/cloud
Auto mount the drive
In order for the USB drive to mount on reboot we have to amend the fstab file with our drives UUID, mount point and permissions. You can obtain your drives UUID with the blkid command from above.
sudo nano /etc/fstab
We need to add the following line replacing XXXX with the UUID of your own drive
UUID=XXXX /media/cloud ext4 defaults 0 0
Test the auto mount
To test the auto mounting without a reboot type
sudo mount -a
Hopefully, there should be no errors and you can check the drive has mounted wiwth the df command. If you did receive an error, go back to the step above and make sure there is not a type within the fstab file.
Permissions
To ensure to the user pi has full permissions issue the following commands
Next we have to configure the smb.conf to share our USB external drive with users on the network.
sudo nano /etc/samba/smb.conf
At the bottom of the smb.conf file add the following text. This will share the /media/cloud directory. Which we mounted our USB drive to, as “cloud”
[Cloud]
comment = Cloud
path = /media/cloud
valid users = @users
force group = users
create mask = 0660
directory mask - 0771
read only = no
Samba permissions
This configuration assumed you will login to the Samba share with credentials. In order to add the user pi to samba use the following.
smbpasswd -a pi
Raspbian configuration complete
The configuration on the Pi is now complete. Assuming you followed all the naming conventions above. You will now have a share on the server “raspberrypi” (the default server name on a Raspbian server), named “cloud”. Which, you are able to connect to with the user “pi” and the password you chose from the final step above. Now all we need to do is configure Dropbox on OS X.
Configure Dropbox
This is the simple part! In the OS X finder there should be a server in the sidebar named “raspberrypi”. Click on this and then click the “connect as” button. Use the credential from the final Samba configuration, so username “pi” and the password you chose.
Link an external folder to your Dropbox
Open the terminal on OS X and use the following command
The easiest way to achieve this is to type “ln -s” at the command line then drag and drop the “cloud” folder from the mounted raspberrypi server to the terminal. Then do the same with the desired folder from your Dropbox account.
And thats it! Now any file you place in the folder in your Dropbox will be stored on the external share on Raspberry Pi. Therefore, not taking up space on your small SSD!
Benchmarks
I benchmarked this setup with a very quick and perhaps dirty test. Using nload, I copied over 40Gb of media data. With varying file sizes, from 4Mb to 4Gb. I received an average throughput of 30Mb and a peak of 42Mb. This is absolutely quick enough to use for this purpose, as the files will not sync to Dropbox anywhere near that speed.
Hang on……
Couldm’t you just link a folder in Dropbox to an external drive on your Mac?
Yes, but then you would have the noise of a spinning drive!
But these files are stored on a server, not locally
I used the term local, to mean within my local vicinity.
Will this work with BOX, OneDrive, etc….
Yes, this will work with anything.
Did you just make this complicated to use a Raspberry pi?
Yes, but I love using Raspberry Pi’s for specific uses. They are so cheap and so much fun to play with.
Continuing my foray into the kitchen, I am amassing an even larger collection of specific kitchen gadgets. With the new diet commencing, I had a need for omelettes. In an attempt to be a little healthier I use more whites than yolks. To aid in splitting the whites from the yolks I purchased an egg separator. It works surprisingly well and acts as a reminder. There is often a solution to a problem, you just have to look for it.
It is often these gadgets created for very specific use cases that enable me to function in the kitchen. While never envisaged to be used for the blind their highly specialised function often makes them suitable for myself.
I have found there are numerous gadgets that aid in the prperation of food but not in the actual cooking. I feel this is because the oven. Hob and microwave don’t receive much focus in terms of specific use cases, and therefore, do not see large functional improvements.
Well at least that was what I thought until I heard about the June oven. Through an integrated high definition camera the June oven is able to identify what you are attempting to make and can suggest estimated cooking times. Right now it can identify chicken, steak, white fish, salmon, bacon, cookie dough, brownies, bagels, toast and burger buns. For a full breakdown of the ovens capabilities its worth checking out this The Verge articles on its capabilities.
The oven is also equipped with WiFi and a touch screen and is able to live stream the cooking process. Along with its ability to estimate cooking time it was the WiFi and touch screen that really stood out to me. With this system having WiFi it doesn’t seem a stretch of the imagination to be able to control the oven through a mobile app.
Imagine an oven I can control through an iPhone app. Be able to set the temperature, have the oven identify that I want to cook a steak and it suggest a cooking time!
This would literally be a game changer in the kitchen for me and open up incredible possibilities in what I am able to cook easily and independently. Pairing it with other technology in the kitchen I can see myself being able to create high quality healthy dishes for the first time in my life
So June, I am here, I will be your beta tester. Lets make an oven that can transform peoples lives.
Over the past few weeks I have become interested in advancing my baking and cookery skills. This introduces a number of obstacles as a blind individual, mainly there are a lot of tasks that have the potential to hurt you!
I have begun to break down these tasks and will be covering them in a series of posts. For today though I would like to focus on weighing.
This is a surprisingly difficult task, from measuring out liquids to weighing items for baking and cooking. There are a few speak kitchen scales out there, but as ever with products for the visually impaired they are grossly over priced for their limited and often lacklustre feature set.
So I was incredibly excited when I found the Drop scales, especially with their slogan “Now anyone can bake”. I certainly fit into the anyone category, so I popped down to the local Apple Store and made a purchase with the idea to test their accessibility. The Drop scale connects over bluetooth to an iPad and displays the weight on screen, it also has a large array of features that walk you through baking and cooking specific items as well as such features as auto scaling the weights of recipes.
I thought this could be the perfect item for me, a feature rich set of scales that would display the weight of an item on screen. VoiceOver could read the weight to me and these scales would solve a large kitchen problem.
Upon testing the app VoiceOver works surprisingly well, a large number of the features can be read aloud and buttons are labelled well. The problem came when I tested the scales core feature, weighing. The current weight is not a VoiceOver selectable item, therefore, the weight cannot be read aloud.
It is worth highlighting that if you have low vision these scales will work well, the current weight is displayed in a white font on a black background. It is very high contrast and is far superior to the small screens that usually accompany kitchen scales.
Not deterred by the scales current lack of VoiceOver support I emailed Drop putting in a request for the current weight to be selectable by VoiceOver. I unfortunately received a boiler plate response that said it was something they may investigate in the future and thanking me for my patience.
This disappointed me more than the scales not working for me. The companies lack of insight into an opportunity. The Drop scales are on price parity with other accessible scales, but are far more feature rich. Therefore, if they were accessible, they could easily take a large chunk out of that market.
There is also the additional business case of the positive marketing they would receive from making this change. It would certainly bring them attention from the VI media as well as the mainstream media.
The business case for this change appears to make sense and that is what is disappointing. As ever making something accessible is way down on the priority list, mainly because this company fails to see the positive impact making something accessible could make.
It would make a huge impact on individuals like myself where it would solve a problem, but it would make an impact on their bottom line. The development cost to make this change would easily be outweighed by the new market these scales would be opened too and the press coverage. Companies need to stop seeing making a product or service accessible as low priority and understand the positive business case for making the change.
Then perhaps the slogan “Now anyone can bake” would hold true.
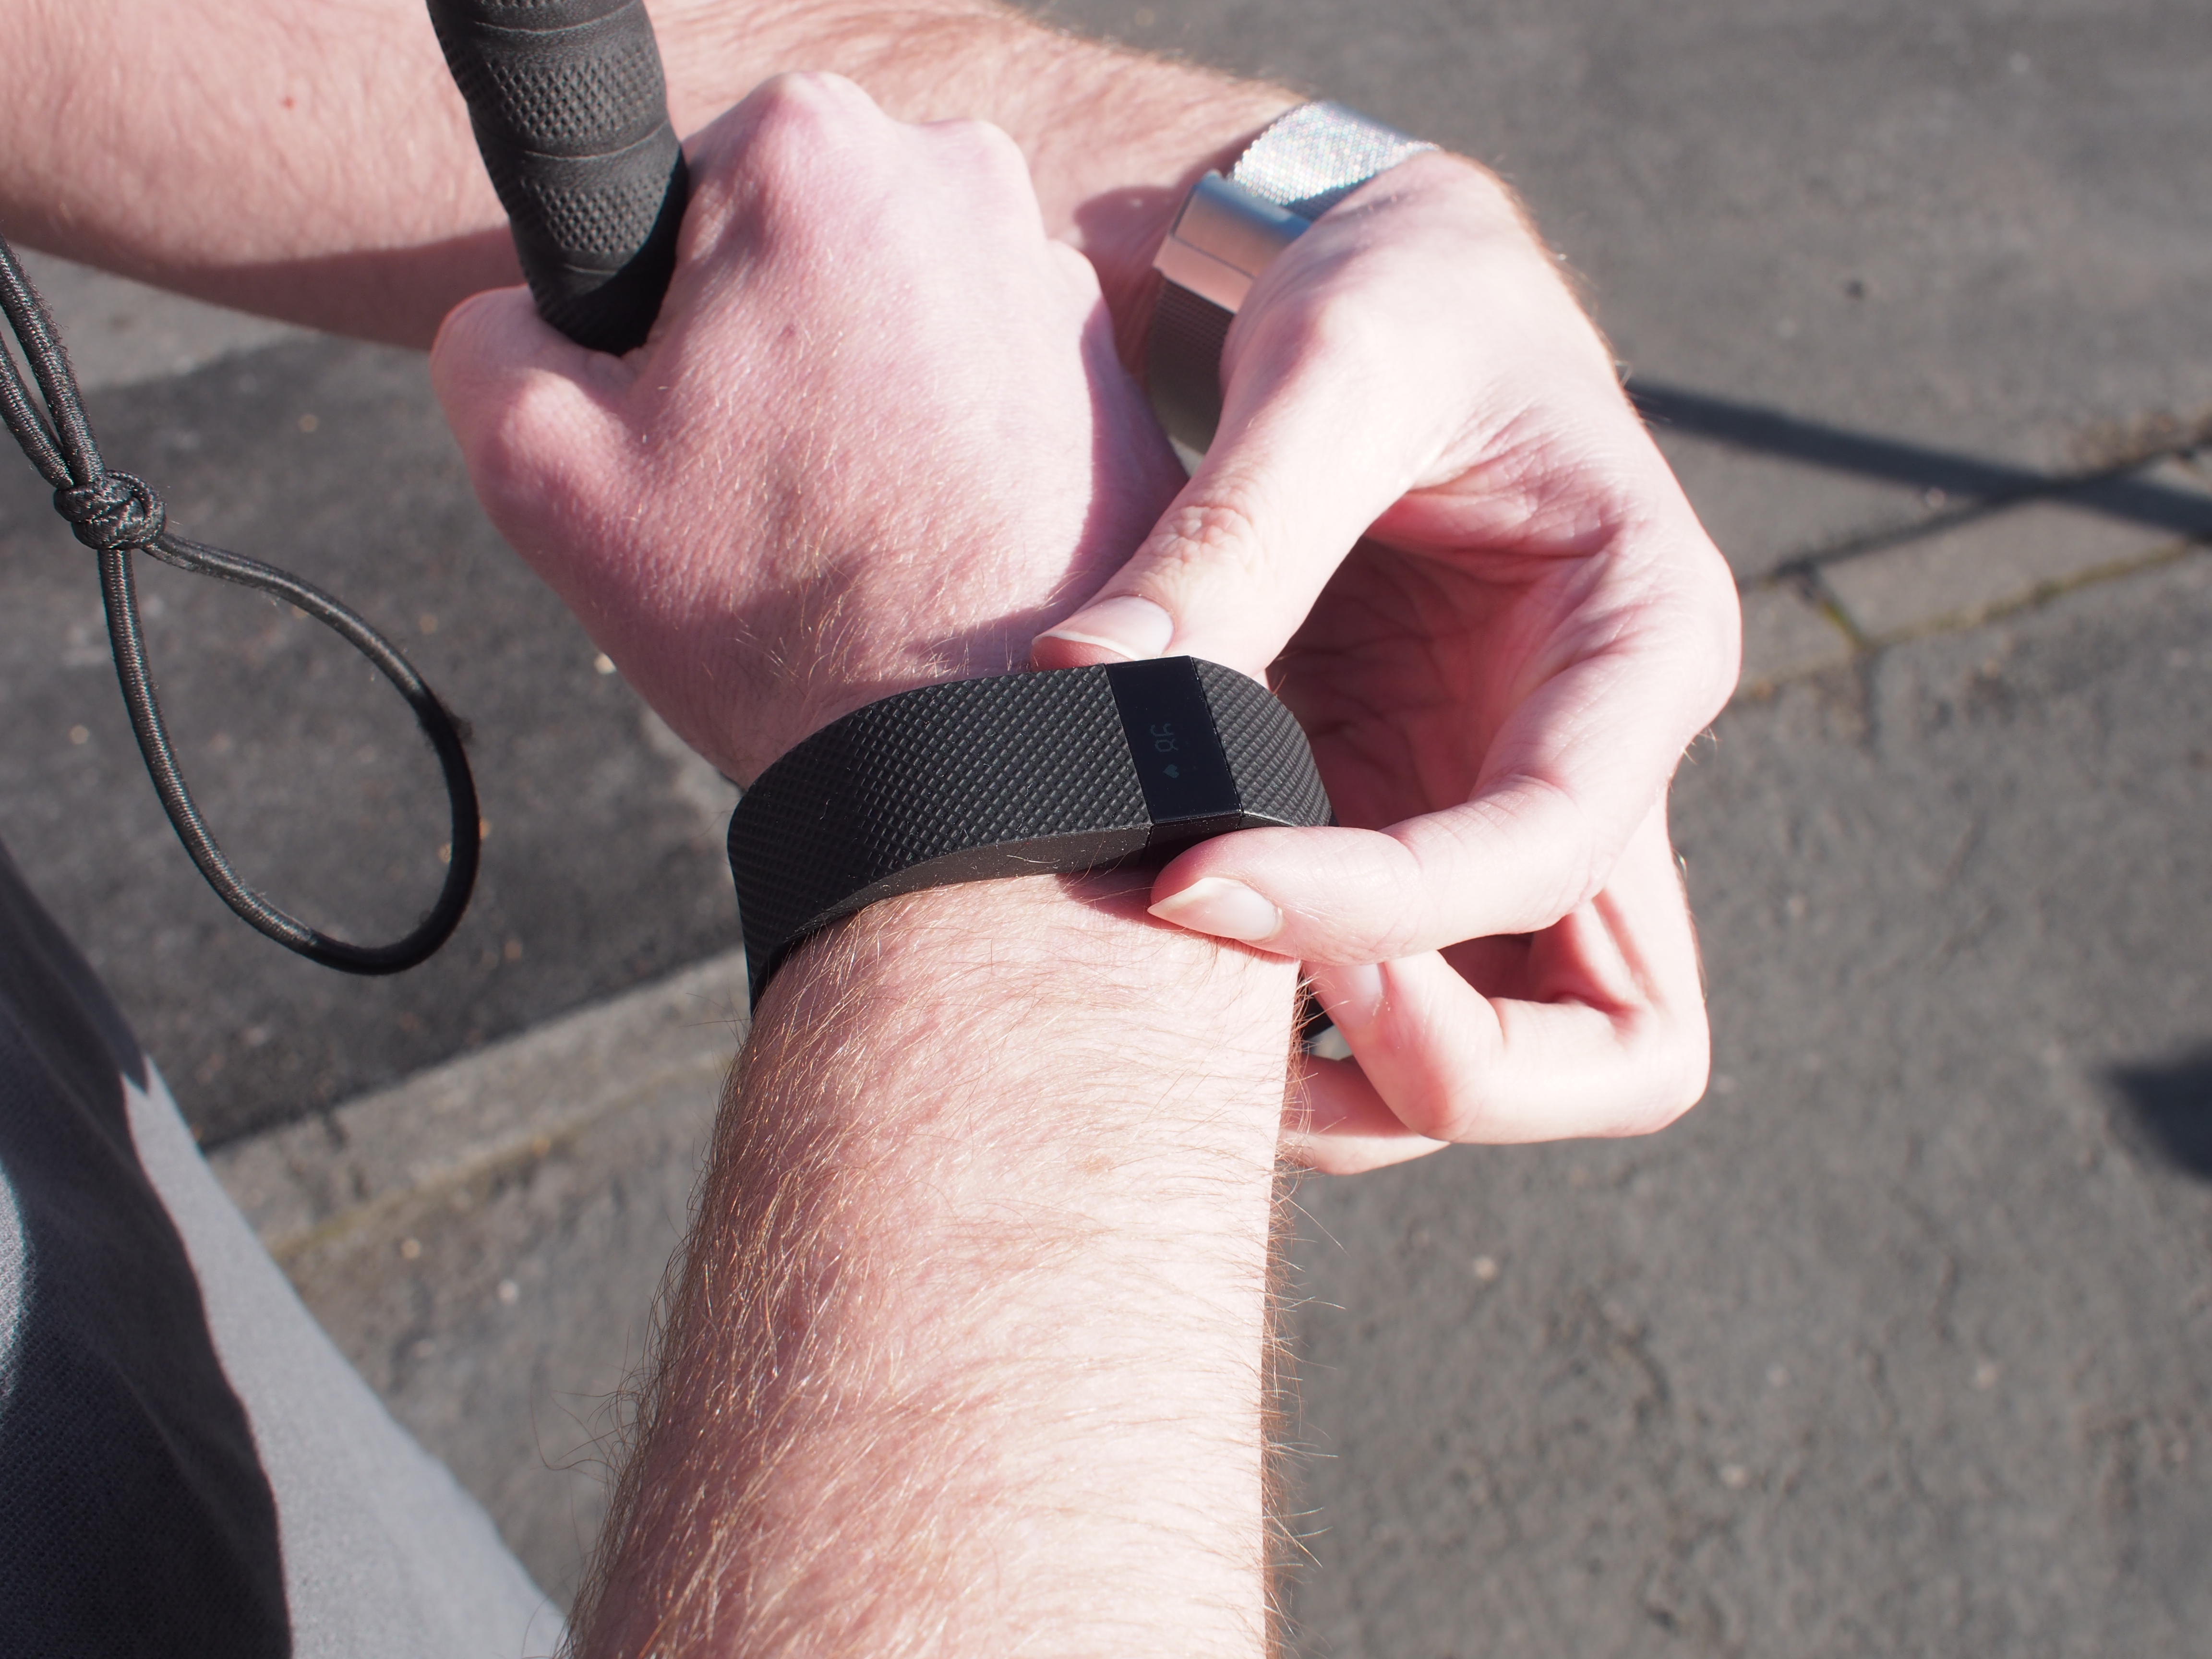
I am a great fan of anything related to fitness tracking. I am constantly testing different wearables to identify one that not only tracks useful information, but is accessible. I was excited to hear about the FitBit Charge HR, as I have become interested in tracking my heart rate. The following review is thanks to FitBit allowing me to test out the Charge HR, in order to highlight how useful it can be to someone with a visual impairment. The FitBit Charge HR is a watch type wearable that is able to track steps taken, heart rate, floors ascended, distance moved and calories burnt.
Setup
For the visually impaired market there are not many consumer goods that can be purchased and configured without sighted assistance. The one exception being Apple, well I say one, there are now two exceptions. As the other is FitBit. I was pleasantly surprised by the configuration of my Aria WiFi Scales, as this could all be achieved from my iPhone. I was further surprised when the same could be said for the Charge HR. As the configuration takes place within the FitBit app it means the entire process can be assisted with VoiceOver, there is however, one little caveat – Bluetooth pairing. This requires you to input a 4 digit number displayed on the screen of the Charge HR, the screen is high contrast so a low vision user would be able to pair. If you are unable to rely on sighted assistance this step can be overcome by using a service such as TapTapSee or BeMyEyes, as the screen is of high enough contrast for it to be easily seen by either of these services.
The ability to configure a device out of the box yourself is refreshing. Especially when the product has not been specifically designed for the visually impaired market. It highlights how achievable these things are.
Application
I first began to use the FitBit application with my Aria WiFi scales and it was that experience which made me seek out the Charge HR. The application is very accessible, the main functions are all labelled appropriately. Therefore, a blind or low vision user could easily use this application to track steps, record exercises and track sleeping habits. However, it is once you want to dig a little deeper that a few accessible issues arise. This however, is more to do with how information is presented, complex data is often represented by bar charts, pie charts and graphs. I can understand why this is the case. However, if there was an option to view the information in a tabulated form it would be far more accessible. I must make it clear that you can access the information, it just takes a little thinking to understand what it means. The video at the bottom of this article demonstrates this.
Heart Rate and Exercise Tracking
For me the opetical heart rate tracking capabilities (no need for a chest strap) of the FitBit Charge HR were the real big draw. While I have owned heart rate trackers in the past, due to my inability to view the watch screen, they have been a post race element. Something I could analyze afterwards but unable to access in real time. Therefore, when I placed the Charge HR on my wrist, opened the app and got a real time readout of my heart rate, this was the first time I could access such information. It is easy for this to be quickly passed over, but for me this was a powerful moment, something that was impossible to do before, was now possible.
This information can also be viewed on the screen of the Charge HR, if you have reasonably acuity and even a few degrees of vision, the screen is viewable.
As the Charge HR records your heart rate throughout the day, it is able to give curent heart rate as well as resting rate. It is actually the resting rate I am interested in. For some reason I have become a little obsessed with a low resting heart rate, and am often find myself with heart rate envy at my friends insanely low resting rates. So this is a nice little touch on the heart rate side.
Your heart rate is also logged during exercise, and post exercise analysis highlights the different heart rate zones as well as time spent in the zone. This activity tracking is where the accessibility of the application becomes difficult. There are some data points which are difficult to convey without the use of pie charts in this section. Therefore, VoiceOver struggles as none of these items are labelled sufficiently to give an indepth sense of what is going on. I also included an insight into this in the video at the bottom of the article.
Steps
Step accuracy is always up for debate, so just how accurate is the Charge HR? Well I wear the Charge HR on my dominant wrist, so I thought this may affect the count substantially. Forunately, there is a setting with the app to choose which wrist you wear the Charge HR. I decided the only true way to test was to count out some steps. So I strode out 166 steps around the house and the Charge HR got it exactly right. I do conceded that 166 is a low number, but I didn’t fancy counting out 2,000 steps to check the accuracy. Now that isnt exactly the truth, I did try, while on the treadmill. But then I got distracted and lost count!
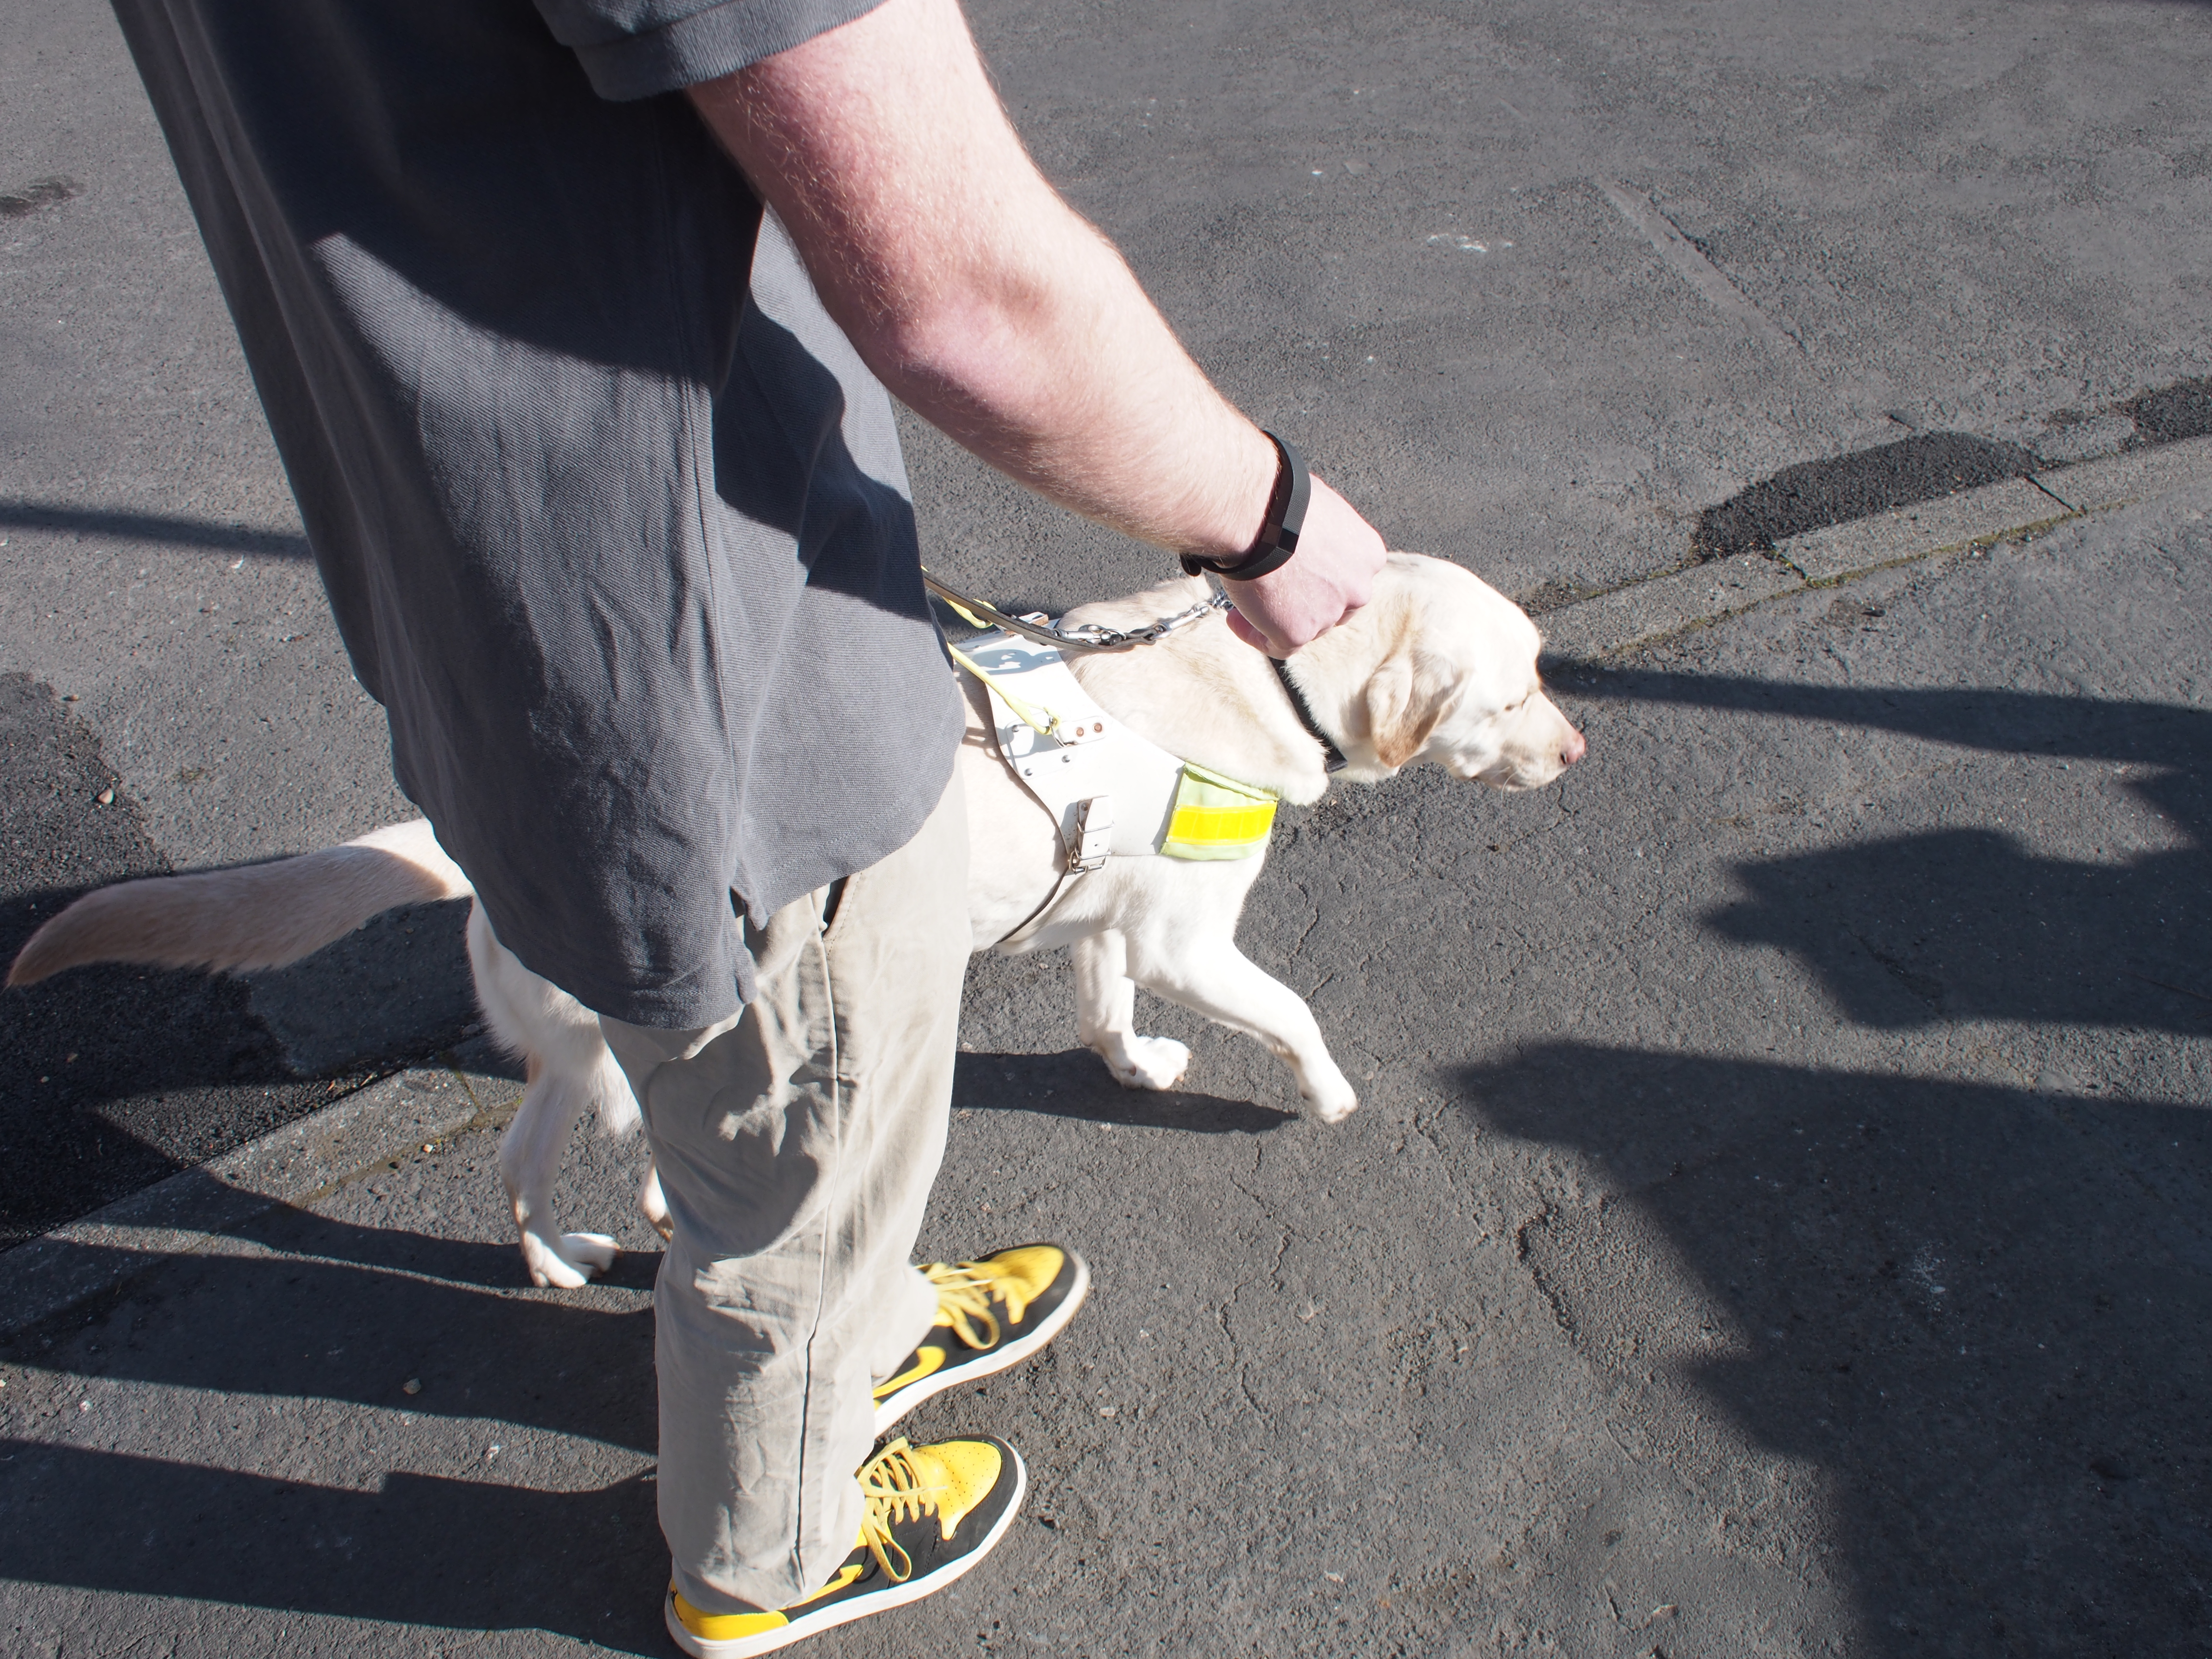
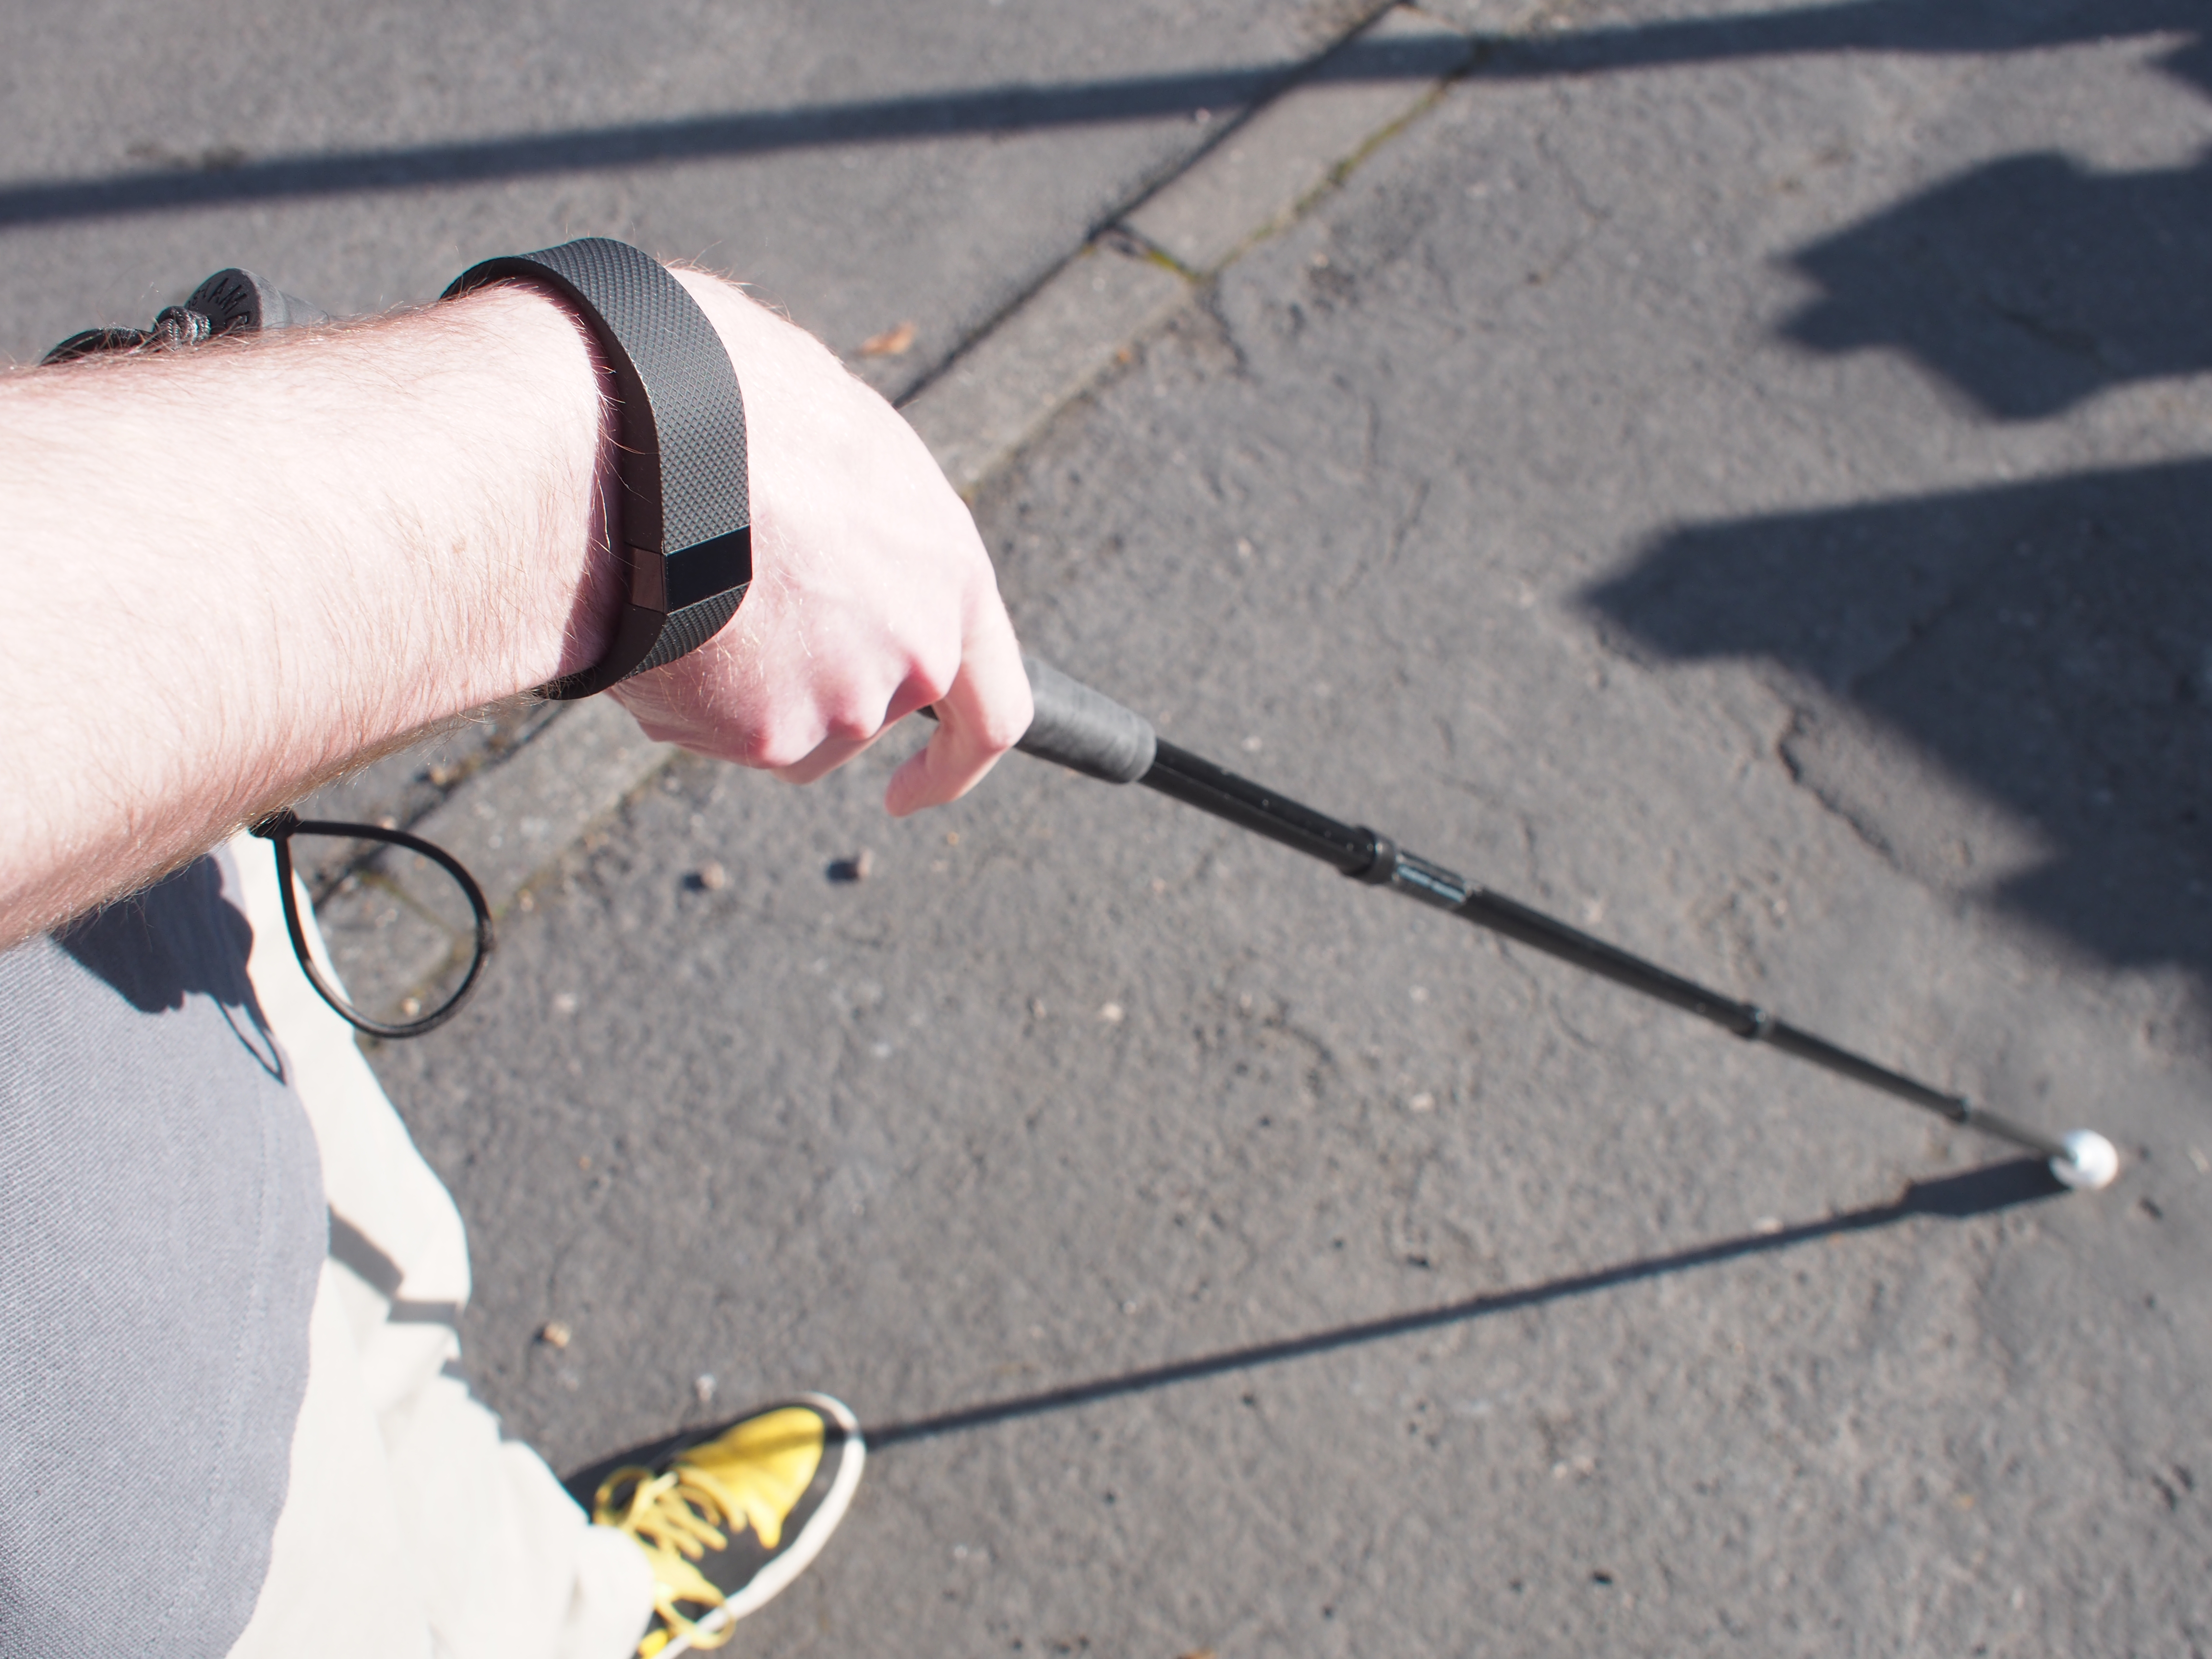
One problem I hadn’t considered when wearing the watch on my dominant wrist was using a long cane for mobility. I usually use my guide dog, but now and again it isn’t appropriate or too difficult to take my dog with me due to travel plans. In these situations I use the long cane, with a sweep or tip tap motion depending on surface. I thought this may stump the Charge HR, as it would remove the arm swing, which I had assumed as used as a variable for tracking steps. However, with a little count off the Charge HR also showed itself to be reliable when using the long cane. Incidently it is find with the guide dog, as I hold the harness in my non-dominant hand.
Silent Alarms
The FitBit Charge HR supports silent alarms. This is a surprisingly great feature for the visually impaired. The alarams are set through the app, therefore, very accessible. Meaning it is incredibly easy to set multiple alarams, that repeat on specific days. For example. My main alarm is for Monday, Wednesday and Friday, as these are the days I wake earlier to workout. It really is an underrated feature, to have the ability to create a series of complex alarms that are a series of vibrations on your wrist.
Challenges
The challenges on the FitBit Charge HR are surprisingly motivational. I would find myself setting a challenge with a friend and pacing around to increase my step count. Perhaps this highlights my sheer level of competitiveness, or that a fitness tracker like this does indeed promote you to move more. However, the challenges system is very difficult to use for the visually impaired, this is due to how the information is presented. Your relative position in the challenges, be it 1st, 3rd or 5th is presented in chart form. This is completely inaccessible to VoiceOver and nothing is read out, the only piece of information accessible through VoiceOver is how many steps you are from the lead, or indeed how far you are in the lead. The video at the bottom of this review briefly touches on this.
Sleep mode
The sleep tracking system of the FitBit Charge HR appears to work very well. It accurately calculates when I fall asleep and when I wake, with moments of restless through the night. Unfortunately however, it suffers the same problem as the challenges and activity tracking. It struggles to convey the information through VoiceOver, you can often find yourself wondering how relevant the information is. But if you are after tracking the simple elements such as duration spent sleeping, number of restless moments and number of times awake it appears to work flawlessly.
Battery
As a blind user the battery was something that concerned me. Often the only indication a wearable’s battery is about to die is visual. So you are often left puzzled as to why your watch no longer tells the time, or why those vital steps are no longer being logged. So I was pleasantly surprised that there are not one but three accessible ways the Charge HR notifies me of a low battery. The first way I found particularly cute, I was sent an email informing me of a low battery. You can also access this information by a notification sent by the application as well as accessing the current level in application. This is particularly helpful when I am travelling for a few days. As I can be sure that the battery level is high.
The battery itself manages around 4-5 days of usage, but I believe this is perhaps reliant on how often the screen is used and indeed your daily step count. For example, on some days I may lot close to 60,000 steps, so I would not expect it to last too long with that rate.
Feel
Upon first wearing the Charge HR it can feel a little strange. I believe this may be a result of the protruding heart rate sensor. However, after a short while accomodation kicks in and you are no longer aware you are wearing the Charge HR.
it is also worth a quick mention about skin irritation. When I first began to wear the Charge HR I did find myself itching a little. Now I am firmly putting this down to the media attention around the issue and the fact during configuration of the Charge HR, it is mentioned. Almost like the affect is being primed, so when you do get a little itch it is quickly attributed to this issue.
However, I can safely say I no longer notice any form of irritation. I even wear the Charge HR in the shower and don’t suffer any irritation.
Overall
I would highly recommend the FitBit Charge HR to a visually impaired user. FitBit achieves something that only a few products are able to, be accessible out of the box. That is especially impressive when you realise it is a mass consumer device and not something specifically made for the visually impaired community. The issues that the FitBit Charge HR does suffer from are all software issues and more precisely issues conveying complex imformation. This is something that is not limited to FitBit and is more a comment on the industries focus on infographics, I would like to see a nice balance between prose and infographics. This could easily be achieved by indepth labelling of elements, as VoiceOver could then give the vital context provided by the graphical elements. However, because this is software, these issues could certainly be addressed in the future and even if not, the device is incredibly accessible as it is. Therefore, if you are looking for a fitness tracking device I highly recommend the FitBit Charge HR.
Running Boston often appears on many marathon runners radars, it had appeared on mine. I did however think a qualifier was a long way off, perhaps 5 years down the line. That was until I had breakfast with a friend of mine.
We were chatting about marathons and I flippantly said yeah cant run Boston this year as its the same day as Manchester. “No it isn’t Simon, its the day after”. Wait so if I ran Manchester quick enough I could get on a plane and run Boston? Then jump on another plane and run London?
After realising it was possible there was only one thing left to do, find a qualifier. It turned out there was one, and only one qualifier left in the UK. Therefore, I had one shot, the only snag, I hadn’t trained since returning injured from the USA.
I turned up to Birchington-on-sea barely fit enough to run a half and had to run a Boston qualifier. It turned out to be one of the toughest races in recent memory. The course itself was a simple out and back repeat, with an aid station back at the start. The first half went reasonably well, then my lack of training shone through, my body just wasnt conditioned to run a marathon, it had been two months of little training while I healed.
My stomach shut down shortly after the half way point, my legs turned into rocks and my guide runner had begun to “motivate” me in his own particular fashion. After a few difficult moments and the very real thought of backing out of the race, it was time to just dig deep. I somehow inched across the line with 2 minutes and change to spare to qualify for Boston. The race had been hell 13 miles of constant struggle. It taught me a valuable lesson, never take distance running lightly, turn up trained or just dont turn up at all.
Thankfully, I did eek out that time, partly due to the “motivation” from my guide and partly because we had travelled way too far to qualify for Boston and I just couldn’t fail.
But now the adventure is on, running 3 major marathons in 7 days!
The audio describing of video content is abysmal. Only a small a mount of video content on television is described and the same goes for movies. Move into the online sphere, Netflix, Vimeo, YoutTube and there is simply no described content.
There are numerous problems like this and addressing them creates huge possibilities for the sighted too. Hence when reading about Clarifai’s deep learning AI that can describe video content I was excited. There system has been created to increase the the capabilities of video search, as if the AI can identify the video content it can serve more accurate search results.
But the ability to perceive and describe what is in a video has implications for the sight impaired. If this could be released as an add-on for Chrome or another browser, it would allow a whole host of video content to be described. While this may be some way off, it is easy to see how such systems can serve multiple purposes.
It also greatly highlights one of my key philosophies, ideas that solve problems for the sight impaired can often have an equal or greater use for the sighted.
Over the past few months I have been training primarily with a friend, she is relatively new to running and is yet to compete heavily. So when the topic of her running her first half marathon came up I thought it might be fun to run it in the snow. That idea was quickly quashed as it turns out it is incredibly expensive to run a snow race – who knew!
A little searching around and we found another half in Terassa, a town an hours train journey from Barcelona. Neither of us could speak spanish but thanks to Google translate and a spanish speaking friend we managed to enter the race. A quick check of the race entrants we noticed we were the only brits, time to represent our country!
It wouldn’t just be a case of turning up and running, we first needed to collect our race numbers and timing chips from Terrassa the day before the race. After 8 modes of transport we finally arrived to collect our numbers and timing chips. This is the first time we noticed there may be a slight language barrier, while a high proportion of people in Barcelona can speak spanish, heading to the smaller towns reduces this considerably. To the point no one at the number collection spoke english, we managed to collect our number, chip, sack and present, we did however, lack any pins to attach our numbers.A prepared runner may have brought their own safety pins, but neither Rachel or I were particulary prepared.
After eating our tea consisting of a chocolate pastry on a bench, unable to find milk in a supermarket ?!?! and somehow even failing to order a meal at McDonald’s, we figured it was time to call it a night.
Waking early we headed to the train station, it was closed… Google maps to the rescue! There was another train station a short walk down the road. As we headed down the stairs we heard the warning beep for doors closing, “*giggling* you don’t think thats our train do you Rachel?”. As we stepped onto the platform our train did indeed pull out of the station. No need to panic though, another train will be along in 20 minutes, it may now be close to make it in time, but we will make it! So we sat down attached our timing chips and ate Jelly Babies as we waited for the train.
Sat on the train we giggled about what a fun story this would make – we only just made it to the race! It would be a great tale to tell. We arrived at the train station, booted up Google maps and we were on our way to the start. We arrived with 15 minutes to spare! We had a quick scoot around the staging area and decided we had time to head to the toilet and grab some pins for our numbers.
There was one portaloo, one toilet, one toilet for thousands of runners. Therefore, the queue ate into our time but it was ok, we were not starting first we would be fine! We hunted around for someone who spoke english and we found a little old lady managing the information stand. We told her we needed pins for our numbers and she gladly obliged. We stood around chatting for a while and heard the starting pistol for the first wave of people. We politely left, but only after persuading her to save all our things while we ran, and headed to the start. We gated with the other runners and set about making sure all our kit was ready to race. It was only then that Rachel noticed everyone elses numbers were a different colour, “you dont suppose this is the 5k race do you?”, “Nah, it cant be!”, “Or is it?”, “Yeah it is, this is the wrong race!”.
Hunting around for someone who spoke english we couldn’t find anyone, convinced marathon was the same in spanish we kept asking anyone in an ear shot where the start of the half marathon was. We quickly realised we were at the start line, we had just missed the start!
Rachel hurridly asked people if we were still allowed to start, we were! So we stood there, with no other runners and crowds of people no doubt staring at us. We began to run and realised we had no idea what the route actually was. We had intended just to follow everyone else. There were a number of road closures but more roads than simply the route had been closed, so we decided the only thing we could do was run fast in the hopes of finding other runners. So with no idea where to go we just started running faster and faster. After asking a few people in high vis where to go we found the sweeper bus. This made us smug with confidence, we were on the right route! We hurriedly sped by as people hung out of the van laughing at the people who missed the start.
We ran off into the distance past roundabouts and barriers, then Rachel noticed we were heading back to the start. The barrier had been moved to account for the 5k race! We had to double back and attempt to find the route. We decided the solution was once again to run even faster, afterall we would surely find someone soon!
After a few minutes we did find someone, the sweeper bus. Yet again shamed by the people on the bus we quickly overtook and headed down the road. This time however, we found another runner. In our heads we celebrated but didn’t want to particularly gloat that we were overtaking a 90 year old man that the crowd who had gathered on the corner were cheering. We continued to run at pace and find more and more people. We quickly decided to settle in to a pace and get on with the race.
Everything was going well until around mile 11 and I began to cramp. This was new to me, in all the races I have run I have never cramped. It hit our pace and we had to slow, we continued to eek out the distance as Rachel – a relatively new runner was putting me to shame. We were approaching the finish! But as as is common in these races it was a false finish, you first had to pass the finish line just to taunt you, then run a further 2k out and back.
A few hundred metres from the finish my leg began to spasm, surely it would hold out to the finish? Thankfully, it did and we crossed the finish line. We had no idea of our time, as I had started RunKeeper a little early, while we gated for the wrong race, but the race clock showed 2h20m. We knew we had definitely beaten that as we were still busy chatting in the race village as the clock started.
After crashing hard after the race, thanks to the last time we ate being 8 hours earlier, we headed back to Barcelona. We celebrated Rachel’s first ever half with a 3 euro bottle of fizzy and handfuls of Pringles. What a race! I wonder when we will find out our result.
The next day we did, 2h20m. It turned out they had turned off the timing gate at the start in preparation for the next race, so our chips never triggered a start, only a finish!
But the race served as a great example of my philosophy around running, its never about the time, its about the experience. We will never forget the moment of panic as we started the race alone, with no idea of the route, or the elation of finding the sweeper bus, for the first and second time. But we would of forgot the time. It’s a number and not a number that affects my experience.